

How to install listmonk using binary on Ubuntu 22.04


listmonk
listmonk is a self-hosted, high-performance mailing list and newsletter manager. It comes as a standalone binary and the only dependency is a Postgres database.
While you can setup listmonk on docker container and the official documents contains detailed information, today our focus is to install it using binary on Ubuntu 22.04. we need to setup ubuntu machine and ssh into it
Let starts:
ssh into your ubuntu machine and run the update
sudo apt update
Install and setup Postgre SQL
sudo apt install postgresql postgresql-contrib
After installation, create a user and database for listmonk and provide privileges to a user on the newly created database
sudo -u postgres psql
create database listmonk;
create user listmonk with encrypted password 'listmonk0101';
grant all privileges on database listmonk to listmonk;
\q
Let's move to the next step to get the listmonk binary from github repository
wget https://github.com/knadh/listmonk/releases/download/v2.4.0/listmonk_2.4.0_linux_amd64.tar.gz
At the time of writing the blog, the latest release is 2.4.0, you can get the latest release from listmonk github repository
Extract the downloaded listmonk binary file and configure it:
tar -zxvf listmonk_2.4.0_linux_amd64.tar.gz
Generate the config file:
./listmonk --new-config
Edit config file and add our database details which we created in first step:
sudo nano config.toml
Do the following changes:
Since I am installing it locally behind the firewall, I will change the address to 0.0.0.0:9000, you can change it to your domain
Set the admin username and password
Update the db details to our database

Press Ctril + X then Y and Enter to save
Install the listmonk and run it
./listmonk --install
./listmonk
At this stage, you should be able to browse to listmonk admin panel using your machine ip with port 9000
Let's create the service to keep it alive even we close the terminal window:
For creating the service first, we need to move the listmonk files to directories
Move the config file to /etc/listmonk
sudo mkdir /etc/listmonk/
sudo mv config.toml /etc/listmonk/
Move the listmonk to /usr/bin
sudo mv listmonk /usr/bin/
Create the service file and paste the configuration from the link in listmonk github repository: Link
sudo nano /etc/systemd/system/listmonk.service
Do the following config changes:
ConditionPathExists=/etc/listmonk/config.toml
ExecStartPre=/usr/bin/listmonk --config /etc/listmonk/config.toml --upgrade --yes
ExecStart=/usr/bin/listmonk --config /etc/listmonk/config.toml $SYSTEMD_LISTMONK_ARGS
Comment out the below lines for systemcall or it will give dump error
#SystemCallFilter=@system-service
#SystemCallFilter=~@privileged @resources
Press Ctril + X and then y and Enter to save it
Enable and start the service
sudo systemctl daemon-reload
sudo systemctl enable listmonk.service
sudo systemctl start listmonk.service
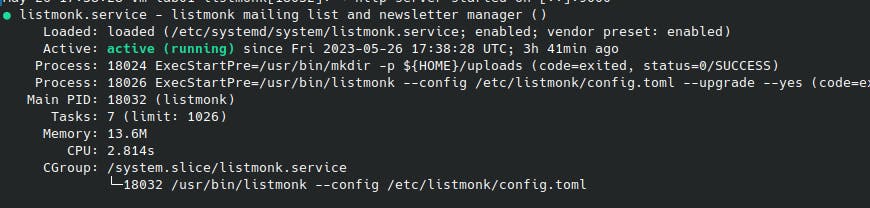
Check the status of the service, it should be active and you should be able to connect to admin panel of listmonk:
Next: Install nginx and configure SSL